For how to add an image gallery, see a later page. To add a single image to your article, put the cursor where you want the image to go, and click the Insert Image button. This will take you to an Image Manager window (see below), wher you can select the image and control the way it looks.
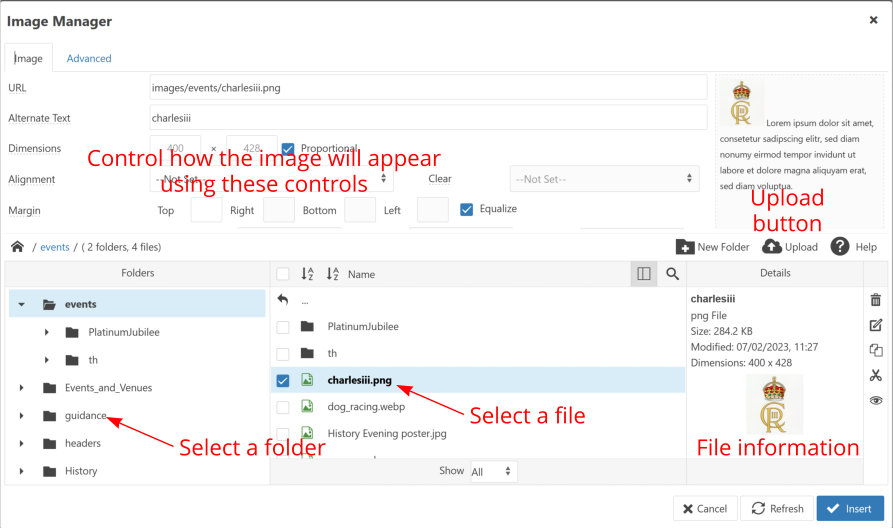
The bottom-left portion of the Image Manager provides a folder tree, and allows you to navigate around the server folders that hold the media accessible on the website. The top-level media folder on the server is actually called /images, but is shown here as Home. Click on a folder to select it, and to show its sub-folders and other contents. There is a New Folder button which allows you to create a new sub-folder within the currently selected folder.
The bottom-centre area is a file list for the currently selected folder, showing files and sub-folders. If you click on a file name here, you will see (bottom-right) a thumbnail and information for the selected file. A link for this file will be placed in the URL box above. To the right of the file information box there are some icons that allow you to delete a file, rename it, or move it.
It is also possible to upload an image from your own computer, using the Upload button. This is a fairly basic file uploader, with fewer facilities than the Media Manager which can be accessed from the Dashboard.
When you have selected an image to add to your Article, you can control how it will appear using the controls in the top half of the Image Manager:
- Alternate Text - This is what will display as a popup when you hover over the image in the website;
- Dimensions - This is where you can control the size of the image in the website. An excellent trick is to set the width (the first Dimensions box) to a percentage of the available space (80% for example) and to delete the height. Leave Proportional ticked. The image will then shrink and grow as the available window size decreases of increases;
- Alignment - You can set the image to appear left-, centre-, or right-aligned;
- Clear - When Alignment has been set, this allows you to prevent text appearing to the left and/or right of the image;
- Margin - This allows you to set the spacing between the image and nearby text;
- Border - This allows you to draw a border around the image, of specified line width, line type, and colour (N.B. You may need to scroll down the Image Manager to see the last options here).
An Advanced tab gives access to some more advanced controls over the behaviour of the image, which can be of use to those familiar with HTML and CSS - for example this can be used to create an image with overlaid text.
Captions: There is no easy method for adding a caption to an image. The best we can recommend is to create a 1x1 table (see the next page), and then to add the image and caption text inside the table cell. It is possible to set the width of the table, its position (to the left, right, or centre of the window), and also to add padding as white spacing between the image and other content. By setting the image width to 100%, it will occupy the full width of the table cell (minus the padding).